Assignment 9: Draw Cylinder in Photoshop
For the Next Project, you will need to draw your own multi tiered cake like so:
For this assignment, we are going to simplify, and have you learn how to draw your own cylinder in photoshop so that you can stack them into a cake!
1. Open a new document. Make it 4 x 4 inches and 300 pixels per inch.
2. Click View->Show->Grid
Make sure View->Snap is checked. Can you see the grid now?
3. Create a new layer. Use the Elliptical tool to draw a top shape to your cylinder. Line it up with the grid boxes so its even. With the ellipse selected click Edit -> Stroke and type in 5 pixels. Click OK.
Your selection should now be outlined!
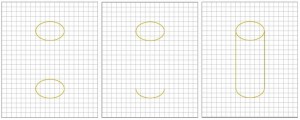
4. Duplicate the ellipse outlines layer and move it straight down as far as you want the cylinder to be high (photo 1).
5. Delete the top half of the bottom ellipse (Photo 2).
6. On a new layer, Draw the sides of the cylinder with the brush tool. Make the brush hard (not fuzzy) and 5 pixels wide to match the line width of the elipses. Hold shift as you draw so the line will stay perfectly straight. Move the line over if you drew it a bit off!
7. Shade the cylinder with the gradient tool. First select the top elipse with the magic wand tool.
8. Use the color you used for the lines and a lighter color. Have the color fade down lighter (photo 1).
9. Repeat this step on the walls of the cylinder . Use a different gradient pattern so that the center of the cylinder is high-lighted.
10. Post Your awesome cylinder as assignment 9! Great job!


Discussion Area - Leave a Comment